
What is EndNote?
EndNote is a software program that helps you organize references and create properly formatted bibliographies. References can be imported from online databases or can be typed in by hand. EndNote works with Microsoft Word to produce bibliographies and embedded references in hundreds of available styles. EndNote also makes it easy to change the style of your references.
For more information, see http://www.lib.uiowa.edu/hardin/endnote
Preparing your EndNote Library
- Open EndNote. If the Get Started with EndNote screen appears, select Create a new EndNote Library and click OK. Otherwise, from the File menu, select New….
- Give your new library a name and save it in a location that makes sense to you.
Installing EndNote’s List of Medical Journal Titles and Abbreviations
Installing this list allows EndNote to move back and forth between full journal titles and abbreviations.
- Under EndNote’s Tools menu, select Define Term Lists, then click on Journals.
- Click the Import List button. Navigate to the folder where EndNote is installed (usually C:\Program Files\EndNote) and open the Term Lists folder.
- Double click on medical.txt. After the terms are installed, click OK.
Exploring the EndNote Library

Adding References
Importing Citations Directly from Databases (ex. EBSCO)
Most online databases offer an Export feature that allows you to transfer citations directly into an EndNote library. The steps may vary slightly between databases. The following steps work in EBSCO databases (such as CINAHL and Academic Search Elite).
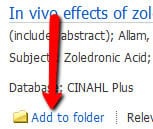 Run your search as usual. From the list of results, select the citations you want to save by clicking the “Add to Folder” link.
- Click the folder icon
 near the top right hand side of the screen.
 - Select the items in the folder.
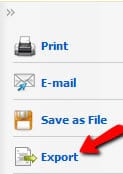
- Near the right hand side of the screen, select the “Export” option.
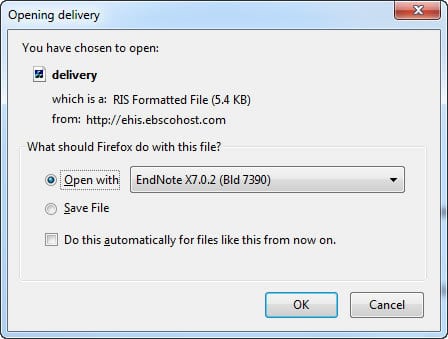
- Make sure that “Direct Export to EndNote, ProCite, CITAVI, or Reference Manager” is selected and then, check the “Save” button on the left side of the screen.
- Your browser may prompt you to pick a program to open the file with. Select EndNote from the available options.
- The imported citations will appear in your EndNote Library in a special group called Imported References. You may want to move them to a group at this time. NOTE: The export feature may have different names in different databases. Look for options like “direct export,” Send to EndNote,” or “Export to Reference Software.”
Importing Citations using PubMed’s Citation Manager (works with up to 200 citations)
Utilizing the “Citation Manager” option will prompt EndNote to directly import citations when you follow these instructions.
- Check the boxes to the left of the citations you wish to move into EndNote.
- Click the Send to link near the top right of the screen.
- Select Citation Manager
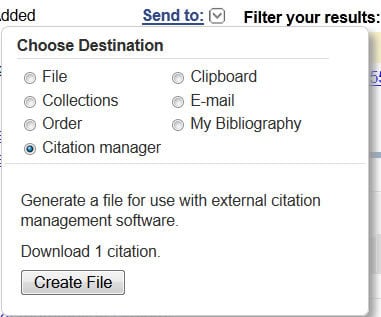 Change the drop box to 200 (this way you ensure all your citations move over) and then click Create File.
 - When prompted, select Open File.
- You may see a screen that says Windows Can’t Open this File. Don’t worry. Check the box that says Select a program from a list of installed programs and then select EndNote (NOTE: You will see an option to tell your computer to always use EndNote to open these types of files so it’s easier to do in the future).
- You will be prompted to Choose an Import Filter. Select PubMed (NLM) from the list and then click Choose. You citations will import into EndNote at this time.
Importing Citations using an Import Filter (ex. PubMed when you have > 200 citations)
PubMed is one of the few major databases that cannot export references directly to EndNote. Instead, you must save your citations as a text file and then import them into EndNote.
- Check the boxes to the left of the citations you wish to move into EndNote.
- Click the Send to link near the top right of the screen.
- Select File.
- Under Format select MEDLINE.
- Click the Create File button.
- Now, save the file to your desktop or another easy to remember location.
- Open EndNote and under the File menu, select Import. You’ll see a box like this:
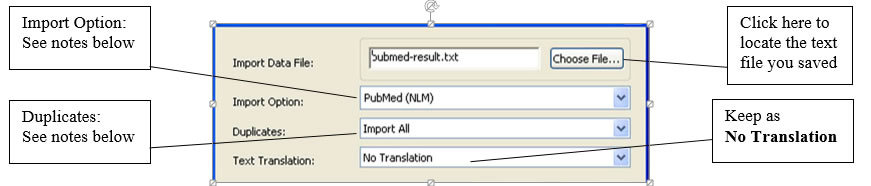
Import Data File: Click Choose File… to locate the text file you saved from PubMed.Import Option: Click on the down arrow next to Import Option to see filters that have been used before. Select the database from which you downloaded your citations. If the database you need isn’t there, click Other Filters and select the desired database.
Duplicates: This lets EndNote know what to do if it finds identical citations. If you choose Discard Duplicates, it will ignore any citations that already exist in the library. If you choose Import All, see Removing Duplicates below to locate and remove duplicates later.
- Click Import. You’ll probably see EndNote counting citations. Note: If your file is downloaded as one big citation, they probably weren’t saved in the correct format: download them again, being sure to save them in the MEDLINE format. If it still doesn’t import properly, you may need to update the filter.
Importing Citations via EndNote (Only recommended for known citations)
If you have a list of citations from PubMed, you can use EndNote to find them and add them to your library. It is not a good idea to search for articles on a given topic with EndNote, though.
- VERY IMPORTANT: Click on the
 globe (aka Online Search Mode). If you skip this step, every citation your search pulls up will automatically be added to your library whether you want them there or not.
 - Select PubMed from the left hand side of the screen.
- Enter the Author, Year, and change the last drop box to Journal before entering the name of the journal you need (You can also change the drop box to PMID if you have one).
- Click the Search button.
- When you find the citation you want, highlight it by left clicking and then right click the citation and select Copy References to à [Name of your library]
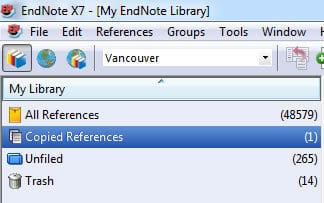 From the top left of your screen, select
  (aka Integrated Local Library & Online Search Mode). You will be asked if you want discard all online references. Click OK.
 - The references you have added will show up under the Copied References in you left-hand menu bar.
Adding References Manually
Occasionally you will want to add a reference to your Library by typing it in, rather than by downloading. Here are some tips:
- Open your database and select Referencesà New Reference
- Select the appropriate Reference Type (ex. Journal article, book section, book, etc.) EndNote will mark fields needed for that type (editors’ names, chapter authors’ names, etc.).
- Fill in the appropriate fields. Author and page number fields should be entered as follows.
- Authors must be entered one per line, so press Enter after each author’s name
- Einstein, Howard G.
- de Gaulle, Charles
- Einstein, H G or Einstein, H.G. (not Einstein, HG)
- Einstein, Albert, Jr.
- American College of Physicians, (notice the comma at the end)
- Page numbers can be entered in any of the following forms, with commas between non-consecutive ranges.
- 1492-1497
- 1492-7
- 124-127, 130, 191-194
- Authors must be entered one per line, so press Enter after each author’s name
Removing Duplicates
- Select Find Duplicates from the References menu. EndNote will scan the Library, and will then show duplicate references it detects. The duplicate citations will be shown side by side and you can select which one you would like to keep.
- You can change the fields EndNote uses to identify duplicates by choosing Preferences… from the Edit menu. Select Duplicates from the left frame. You can then select which fields EndNote will compare, and whether they need to match exactly or if EndNote should ignore spaces and punctuation. By default, EndNote compares the author, year, article title, and reference type fields.
NOTE: The same article downloaded from different databases may have slightly different authors, titles, and even journal names (some databases do not include all authors for example, or may include a longer subtitle); EndNote will not usually recognize these as duplicates.
Linking PDFs or Other Files to EndNote References
You can attach a PDF or other file to a reference in EndNote. The file can be on your own computer or on the Internet.
- Open the reference to which you wish to link.
- To link to a file on your computer, select a citation, go to the References menu and choose File Attachments and then Attach File…. Locate the file and click Open.
- To link to a file on the Internet, simply type (or paste) the URL into the reference’s URL field.
Set up EndNote to Find Full-Text
EndNote can attempt to locate the full text (PDF or HTML) of articles in your library. Full text availability is limited to journals to which the UI Libraries subscribe electronically and for which full text is available.
To set up Find Full Text:
- From the Edit menu, select Preferences.
- Click on Find Full Text.
- In the Open URL Path box, enter http://uilink.lib.uiowa.edu/view/uresolver/01IOWA_INST/openurl
- If you are using EndNote from off-campus, you will need to enter https://proxy.lib.uiowa.edu/login beside the box labeled Authentication URL.
To find full-text:
- Select the desired references in your EndNote Library.
- Right click and then select Find Full Text from the pop-up menu.
- Click OK on the copyright notice. EndNote will begin looking for full-text and will track its progress in the blue side panel.
- When EndNote finds a PDF, a paperclip appears in the attachment column, and the PDF appears in the File Attachments field of the reference. Click on the PDF to open the article. PDFs are stored in the Endnote library’s .data file, in a folder called PDF.
- If EndNote can only find an HTML version of the article, a link to that version appears in the reference’s URL field.
Enable UILink
By enabling UILink in EndNote, you can easily get to the full-text of an article from the EndNote record
- From the Edit menu, select Preferences
- Click on URLS and Links
- Paste http://uilink.lib.uiowa.edu/view/uresolver/01IOWA_INST/openurl into the box labeled ISI Base URL. You can now click OK.
- To use UILink, click on a record, then go to the References menu and select URL and then OpenURL Link. The UILink window should appear.
Creating Groups
Groups provide a nice way to organize your citations and group together citations on a similar topic or citations for a certain project. Select Create Group from the Groups menu
- Name the group
- Drag and drop citations from into your new group. The same citation can be in multiple groups
To Create a Smart Group:
- Select Create Smart Group from the Groups menu
- Set the criteria for the Smart Group. EndNote will automatically add any citations to the Smart Group that meet the criteria that you set here. Try entering a specific author, year, journal, or keyword.
Producing a Bibliography
- When EndNote is installed, it will also create an EndNote ribbon in Microsoft Word 2007 and 2010 (in older versions of Word, it will create a toolbar instead). You can use this tool to add, remove, or rearrange citations within the Word document. EndNote will renumber or re-alphabetize as necessary.

 At the top of the EndNote ribbon, you’ll see a drop-down menu showing the style currently being used. Use this box to select the appropriate Style. Click on Select Another Style… to see all available styles.
- Place your cursor where you want to enter your first reference, and click Insert Citation in the EndNote X6 menu. An EndNote X6 Find & Insert My References window will open. Enter keywords and click Search to search through your whole library. A list of matching references will appear. Select the one(s) you want to use and click Insert.
- EndNote will embed the citation in the desired format, and append the bibliographic reference at the end of the paper. This may not be instantaneous; if you have many references, you will probably first see a generic citation that looks like this: {Albretsen, 1998 #11} for a short while before the formatted citation appears. If these generic citations don’t go away, or if the wrong output style is being used, see Changing the Format of a Bibliography in the next section.
- If you need to edit a citation (such as to remove the author or year from the in-text citation or remove one citation from a group of several), click on the citation, then click on Edit Citation(s) from the Endnote toolbar.
- When you are all done, save your document.
- Remember to proofread your bibliography! There may be small formatting errors or even typos that you should correct manually. If you find major formatting errors, make sure you are using the correct output style.
Removing Field Codes
If you are submitting the document electronically—especially to a publisher whose Instructions to Authors say not to use EndNote—you will need to remove the field codes.
- Click Convert Citations and Bibliography from the EndNote ribbon’s Bibliography panel.
- Then select Convert to Plain Text. Word will create a new copy of your document without the field codes. NOTE: Be sure to keep the original version of your document with the field codes in case you need to make any changes. EndNote cannot work with a document that has been converted to plain text.
Changing the Format of a Bibliography
- In the EndNote ribbon’s Bibliography panel, select the output style you want to use. If your style isn’t on the dropdown, pick Select Another Style…to see the full list. Select the appropriate style and click OK. It may take a few seconds for the bibliography to be reformatted.
- If it doesn’t reformat automatically, click Update Citations and Bibliography from the EndNote ribbon’s Bibliography panel.
Moving an EndNote Library to Another Computer
If you need to move your EndNote Library to another computer, or want to share it with another EndNote user, you will need to move two separate parts, which will be located in the same folder. These two parts are your EndNote Library, which will have the extension .enl, and a folder with the same name as your EndNote Library, but with a .Data extension. In EndNote X6, these two files can be compressed into a single file, which makes moving the file or attaching it to an email message simple.
- Go to EndNote’s File menu, select Compressed File then Create or Create and Email. The library and data file will be compressed into a single file with a .enlx extension. To open this file, simply double-click it (note: the recipient must have EndNote version 9 or later to open the file).
Setting up Sync to EndNote Basic (Online)
Syncing allows you to access all of your references stored in your desktop library from the web, and is available for Endnote X6 and later. It is only possible to sync one desktop library with one online library at a time.
To sync your desktop library with an online library:
- Create an EndNote Basic account from the sign up link on this page: http://guides.lib.uiowa.edu/citingsources/HardinEndNoteBasic
- If you already have an online account, remove duplicates, place all in groups, and empty the trash.
- Open the desktop library that you would like to sync. Remove duplicates, make sure all references are in groups, and empty the trash.
- Open the desktop library and access Edit menu. Select Preferences and then Sync (you can also alter preferences regarding initiating sync and frequency of sync here).
- Enter credentials for the EndNote online account.
- Select blue sync icon in middle of the desktop library toolbar and allow some time for sync to occur. You should be able to find the sync status button in upper left pane.
- All references, groups, and associated files (including PDFs) should be available in the online account after the sync is complete.
Keep in mind that references sync in both directions. References are retrieved first from the online account and then transferred to the desktop before any changes from desktop are updated in online account.
This video highlights how to sync multiple desktop libraries by using the sync feature and is only 5 minutes long: https://www.youtube.com/watch?v=YIzbdvRNz8Q
Need More Help?
EndNote’s Help files contain a lot of very good information, and is generally well-written. Advanced users are advised to review the table of contents and read sections of interest.

You can also view the EndNote page at Hardin for additional information. http://www.lib.uiowa.edu/hardin/endnote
As always, you can contact the Hardin Library Reference Desk (lib-hardin@uiowa.edu, (319) 335-9151) with any questions.
Acknowledgments
Thank you to Lynda Howell at UTHSCSA, who wrote the handout which formed the basis of this guide