
Who can deposit data in IRO?
- University of Iowa faculty and staff from any department, research unit, or center
- University of Iowa students with authorization from a sponsoring department or faculty member
- Other individuals affiliated with University of Iowa (e.g. contributors to University of Iowa sponsored conferences, journals, or special events)
If you want to deposit data but do not have access, contact us.
It’s helpful to have the IRO Metadata Best Practices page open in another tab, or print out a PDF of the guide to reference while you deposit data into IRO. It offers additional guidance on some of the steps below.
Video guide (four short videos)
Depositing your data includes four major stages:
Upload Your Data | Describe Your Data | Specify Information about Your Data | Acknowledge Grant Funding
First: Upload your Data
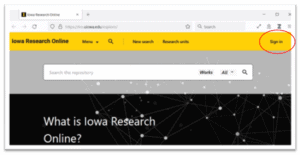
1. Navigate to Iowa Research Online and Sign in (upper right-hand corner).
2. Enter your HawkID login.

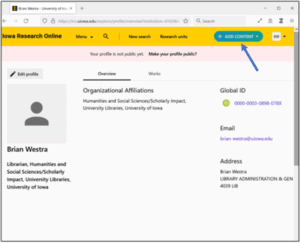
3. Click on “+ADD CONTENT” in the upper right-hand corner.
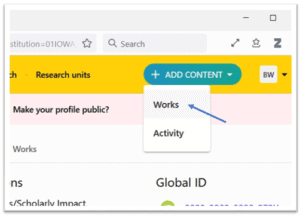
4. Choose “Works” from the drop-down menu.
Selecting your Works Type and Title
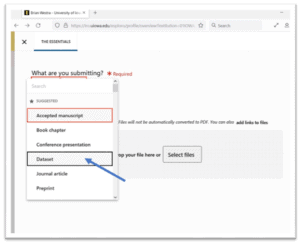
5. From the “What are you submitting” drop-down menu, choose Dataset.
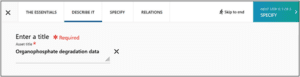
6. Under “Search for your dataset,” type the title of your dataset to check if it’s already in use. Note: the best titles make clear that the content is a dataset, such as “Organophosphate degradation data” or “Dataset for organophosphate degradation study.”
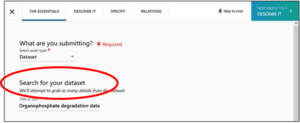
7. If that title is available, you will see the “We found nothing…” notification and you can use it. If that title is found, try an alternative descriptive title for your data.

Adding Files
8. Click “Select Files” to upload your dataset file or use drag and drop. Note: Ignore the “add links to file” option. Also, although the system states that the maximum file size is 500MB, we can support larger files although the upload process will be slightly different. Please contact us if you have large files and we’ll help you with the submission process.
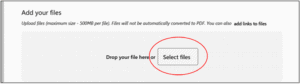
9. For this example, we will choose “select files” and upload our dataset as a CSV file.
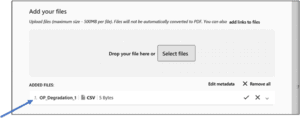
10. In addition to the CSV document with the data, we have added a TXT file for our README. To set the content type for this file, click on the file name, choose the drop-down arrow to the right of the upload, and choose “+ Set Content Type” below the uploaded file.
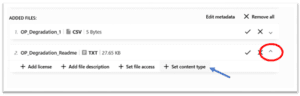
11. Since this TXT file is a README, we have selected that content type from the drop-down menu.
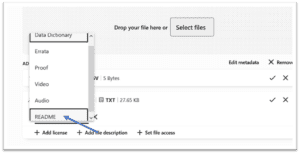
12. Repeat steps 10 & 11 for each file you add, choosing the appropriate content type for each file. For this example, we have chosen “Data Dictionary” as our third file.

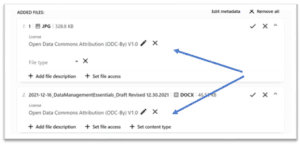
13. If you would like to add a license to your file or dataset, click on the file name and then choose “+ add license”.
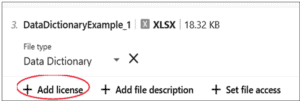
14. A pop-up window of license options will open; click the license type to select it. Note: you can choose a separate license for each file individually or apply one license type to all the files by checking the “apply to all files” box. If you need help choosing a license for your dataset, see this page.

15. In our example, we have selected the Open Data Commons Attribution license and applied it to all uploads.
Second: Describe Your Data
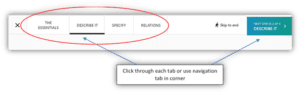
1. In the top navigation menu, you can (a) click through each tab or (b) use the upper right corner navigation and click the forward arrow “>” to proceed through the steps.
2. The title should auto-populate based on the title you assigned when you uploaded the data.
Adding Keywords
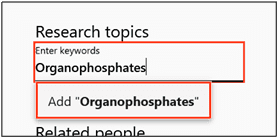
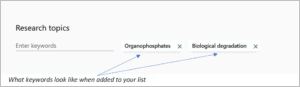
3. Enter descriptive keywords that will help a potential user find your dataset, then press “enter.” Each keyword must be entered individually; the system does not allow for typing multiple words with commas separating each one. If your descriptive phrase is two words, you may separate with a space, and then press ‘enter’.
Adding Authors and Related People
4a. Your name should auto-populate since you are logged in. Note: Ignore the drop down to “select role” for each author.

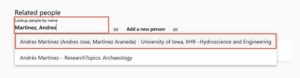
4b. To add additional people, look them up by name. Begin typing their name into the text entry field (Last Name, First Name). Please note the following:
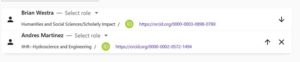
i. Make sure you add the correct person. In the example below, you can see there are two different people in different disciplines with similar names.
ii. If you cannot find a name, contact us and we will add them. (Be aware this is especially common with graduate students.) Do not add a new person to the system. You can continue with the next steps in the submission process even if all people are not yet added.
5. Once all authors are added, you can organize them in the order chosen for publication using the up and down arrows to the right. The author at the top of the group will be listed first.
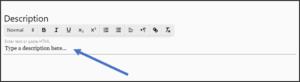
6. Offer a brief description of the dataset. This will be the abstract for the dataset. Note: this description should be specific to the dataset and should be different than the abstract for the article you’re publishing.
Third: Specify information about your data
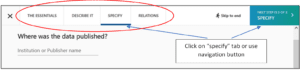
1. Next move to the “Specify” tab or click the navigation button in the corner.
Adding Publisher, DOI, Collection Dates, Language
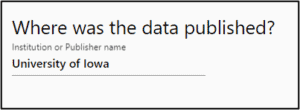
2. For “Where was the data published?” use University of Iowa (unless the data was already published elsewhere or is a subset of previously published data.)
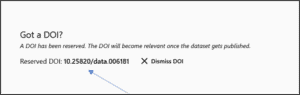
3. Click reserve a DOI to include in the citation for the manuscript you’re submitting.

4. The system will generate a DOI for your data.
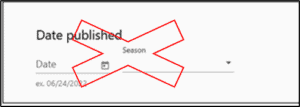
5. Ignore the “date published” prompt. Note: we will enter this into the system when the dataset is published.
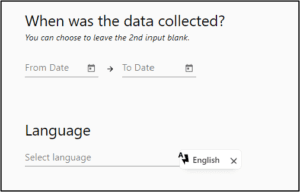
6. Enter the dates the data was collected, then select the language of this publication from the drop-down menu.
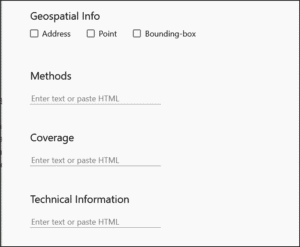
Adding Methods, Coverage, Etc.
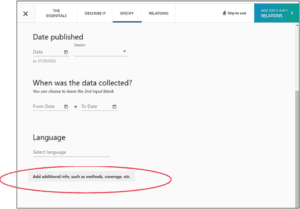
7. Click “Add additional info, such as methods, coverage etc.”
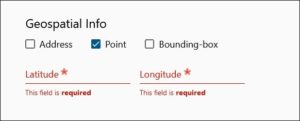
8. Now you can add geospatial, methods, and/or technical information, if relevant.
9. Geolocation information is only needed when the location where the data was collected is relevant to the data itself (e.g., a sediment sample collected in a specific location).
a. If you add geolocation information, use WGS 84 (World Geodetic System) coordinates.
b. Use only decimal numbers for coordinates. Longitudes are -180 to 180 (0 is Greenwich, negative numbers are west, positive numbers are east), Latitudes are -90 to 90 (0 is the equator; negative numbers are south, positive numbers north). For example: Latitude: -79.272 Longitude: 37.114
10. If you add methods information, focus on the methods that are relevant to the data. This should describe the methodology employed for the study or research. This information can be entered as text, or you can paste HTML.

11. Ignore the coverage information.

12. If you add technical information, include If you add technical information, include information about the design, implementation, operation, use, and/or maintenance of a system or process.

Fourth: Acknowledge Grant Funding Related to your Research Data
1. Navigate to the Relations tab either by clicking directly on the tab or using forward navigation in the upper right-hand corner.

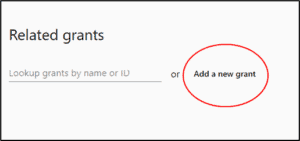
2. Search for the grant either by name or ID. If entering information about an NIH grant, see step #3 below.
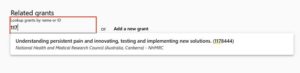
3. For NIH grants, search by the grant number – specifically the activity code, institute/center, and serial number. The grant number typically begins with a letter and is followed by a series of numbers, omitting application type, support year, etc. This image from NIH has an illustration of what numbers are relevant.
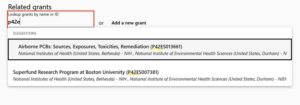
4. If your grant isn’t in the system already, choose “Add a New Grant.”
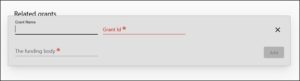
5. Enter the grant name, ID, and funding body for your grant (these items are required before you can move forward in the navigation.)
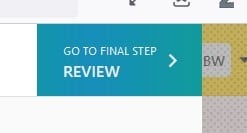
6. Navigate to the Review tab using the upper-right hand navigation.
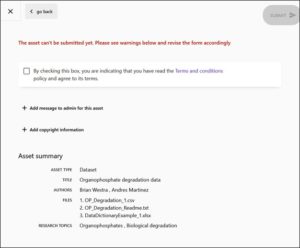
7. Review the Asset Summary for accuracy. Read the Terms and Conditions policy and check the box indicating that you agree. This will toggle the submit button to be functional, then hit “Submit.”
8. Your documents and descriptions will now be reviewed by UI Libraries.